
First, I’d like to reference an excellent video tutorial that I used for my initial foray into the Vagrant world. Click here to see that tutorial.
Disclaimer: This blog entry does not necessarily follow safe computer/networking procedures. Use this only as a reference.
General outline:
- Install Oracle Virtualbox – you’re going to love this!
- Install Vagrant – gonna love this, too!
- Update and config Vagrant – PHP, MySQL, Apache.
- Connect and play!
Okay, I won’t go into any specifics but hopefully you can follow along. Download and install VirtualBox. This was the correct link on February 2, 2015. The installer you want is the Windows (32-bit/64-bit). You might have to answer some questions and do a reboot during the install (I don’t remember), but it should be fairly straight forward.
Install Vagrant as shown in the video referenced above. It really is an excellent tutorial.
Vagrantfile mods:
config.vm.network “private_network”, ip: “192.168.33.10” // uncomment this line so you can reach webserver at this address
config.vm.synced_folder “data”, “/var/www/html” // mod like this
Create data folder in ubuntu folder
add html files there and they will automatically show up on the server
Open a command prompt and change directory to vagrant install:
ex: cd C:\Users\robert\VirtualBox VMs\Vagrant\ubuntu
vagrant up
Download and install PuTTY – I used ‘A .ZIP file containing all the binaries (except PuTTYtel), and also the help files’
Using PuTTY ssh into box:
host name: vagrant@127.0.0.1
port: 2222
open, then enter password of vagrant
Installing apache, mysql, and php:
sudo apt-get update // update packages
sudo apt-get install apache2
sudo apt-get install mysql-server libapache2-mod-auth-mysql php5-mysql
sudo /usr/bin/mysql_secure_installation // secures installation
sudo apt-get install php5 libapache2-mod-php5 php5-mcrypt
sudo apt-get upgrade // upgrades packages
sudo apt-get install vim // I like vim for editor
cd /etc/apache2/
sudo vim apache2.conf
mod apache2.conf as below:
<directory>
Options FollowSymLinks
AllowOverride None
Require all denied
</directory>
<directory /usr/share>
AllowOverride None
Require all granted
</directory>
<directory /var/www>
Options Indexes FollowSymLinks
AllowOverride All
Require all granted
</directory>
sudo a2enmod rewrite // enables rewrite
sudo service apache2 restart
Setup for HeidiSQL:
Go to C:\Program Files (x86)\PuTTY\puttygen.exe in Windows explorer
load: C:\Users\robert\.vagrant.d\insecure_private_key
Save private key: vagrantPrivateKey.ppk
Notes: winscp – doesn’t allow for commands that require input/feedback, so I went with PuTTY
putty
// vagrant@127.0.0.1, 2222, ssh – password once at command prompt
192.168.33.10
Tip: You can use virtual box to start vagrant’s install of linux and ssh from there.
Connect to MySQL:
HeidSQL Settings

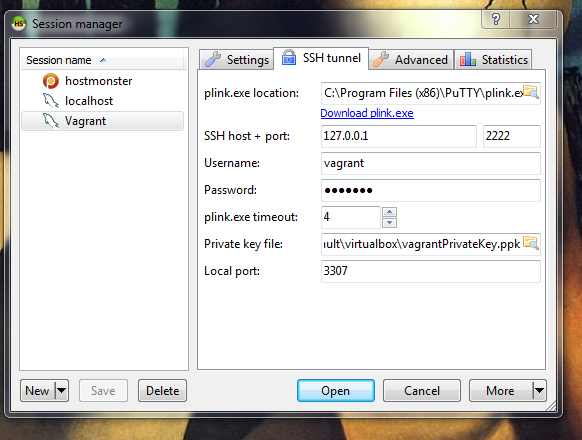
You will need to tell HeidiSQL where plink.exe is located (click folder icon)
MySQL Workbench Settings
Initially, do not put in usernames and passwords – wait till you’re trying to connect and it asks for them (you can have them saved at that time).
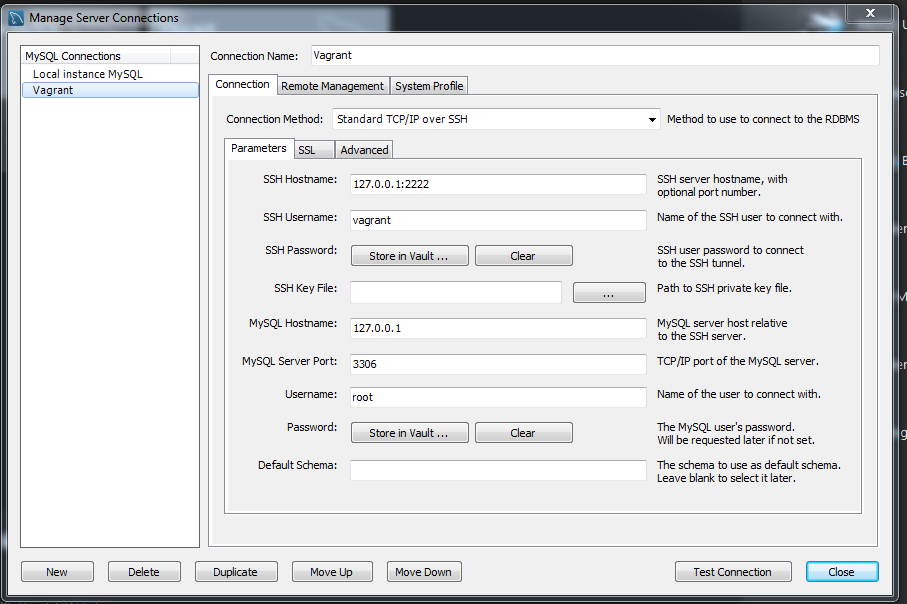


Note: I had a lot of trouble getting Workbench to work at first. I would suggest trying HeidiSQL first.
Start and Stop
To make life easier I made 2 batch files to start and stop Vagrant. When opening a command prompt my computer naturally goes to C:\Users\robert\, so I placed the files there, and then created shortcut links on the desktop. You could also put a link to vagrantup.bat in your Startup (menu item):
vagrantup.bat
@echo off
cls
cd “C:\Users\robert\VirtualBox VMs\Vagrant\ubuntu”
vagrant up
vagranthalt.bat
@echo off
cls
cd “C:\Users\robert\VirtualBox VMs\Vagrant\ubuntu”
vagrant halt
Play
Additional fun things you can try. Once you have installing the system down, it takes less than 1/2 hour to completely redo, so experiment and have fun (I did):
sudo apt-get install ubuntu-desktop
startx or /etc/init.d/gdm start for gnome desktop and /etc/init.d/kdm start for the kde desktop or gnome
Ctl+Alt+T to bring up the Terminal.
sudo shutdown -h now or sudo halt
ctrl + alt + t => command prompt from desktop
ctrl + alt + F1 => command prompt from login screen
sudo adduser newuser